Use B.AI in Video Creation Tools
Configure your B.AI API Key in a video creation tool that supports custom providers or plugins to use models supported by its adapter. This guide uses Toonflow as an example.
1. Prepare Your Key and Adapter
- Create an API Key in the B.AI console and confirm that your account has sufficient balance.
- Install Toonflow.
- Download the B.AI video provider adapter.
The adapter connects the tool to B.AI and handles model parameters, task queries, and result downloads. Plugins made for other platforms are not necessarily compatible with B.AI; replacing only the Key may not work.
2. Import and Configure B.AI
- Open Toonflow and go to Settings → Media models → Add custom provider.
- Select File import, import the downloaded
.tsfile, and confirm that you want to add the provider.
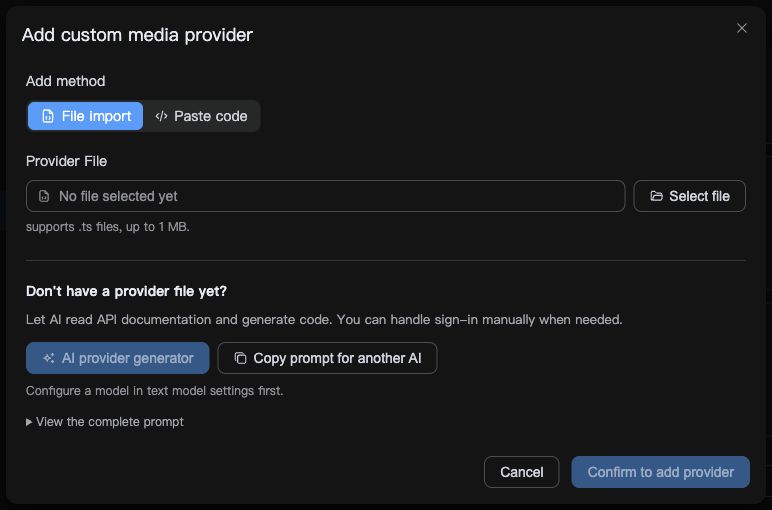
Figure 1: Use File import to upload the adapter file.
- In the new B.AI provider, click Edit model, enter the following settings, and save.
| Setting | Value |
|---|---|
| API Key | Your B.AI API Key, without the Bearer prefix |
| Base URL | https://api.b.ai/v1 |
| Model ID | A model ID published in the B.AI documentation and supported by the current adapter |
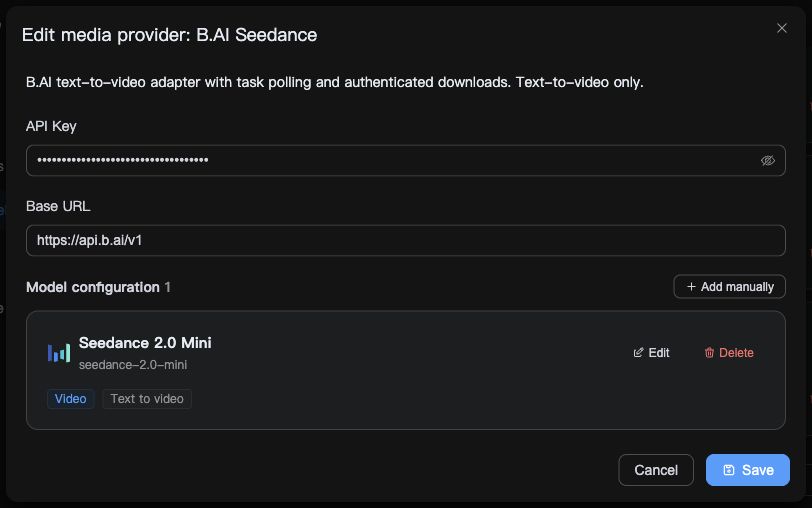
Figure 2: Enter your connection details in API Key and Base URL. The model shown is an example, not a complete list of supported models.
When B.AI adds a model, the creation tool or adapter must also support it before you can use it in the tool. Refer to the current documentation and adapter instructions for model IDs, input materials, and available parameters.
3. Generate and Save a Video
- Create a project, open the canvas, and add a Video generation node.
- Select the B.AI provider and your model, then enter a prompt.
- Select a supported duration, resolution, and aspect ratio. For your first test, use a short duration and a lower resolution.
- Click Generate video. When the task finishes, preview and download the result.
Start with a simple prompt:
Gentle waves wash onto a beach at sunrise, soft sunlight, a fixed camera, and no subtitles.

Figure 3: A player screenshot showing an example output. Results and available parameters vary by model.
Video tasks usually pass through queuing and generation. Once you have a task ID, continue querying the original task rather than repeatedly clicking Generate; each new task may incur charges.
Troubleshooting
| Issue | What to Check |
|---|---|
| Model not found | Confirm that the current adapter supports the model and that its configuration has been saved. |
| Authentication failed | Check that the Key is complete and valid. Use the identity that created the task when querying or downloading it. |
| Insufficient balance | Check the available balance and permissions of the account or team associated with the Key. |
| Timeout or download failure | Keep the task ID and error details, query the original task's status first, and avoid duplicate submissions. |
Using an Agent: A video model generates video. If you want an Agent to understand instructions, write scripts, or plan storyboards, configure a text model separately.
Using ComfyUI: Install custom nodes that support B.AI, configure the Key according to the node instructions, and import the workflow. Supported models and operations depend on the node version.
Related Documentation
- Generate Seedance Videos with Codex: Use CC Switch to configure B.AI and let Codex create, query, and download a video.
- Video Generation API: Model IDs, parameters, and API requests.
- Video Generation Model Pricing: Billing units and prices.
Do not share your real API Key publicly.